Trick or Treat: Homemade Halloween Candyfeatured
Growing up in the Northeast, October always brought a little something special in the air. A tinge of excitement, anticipation, promises of tricks and treats to come. The leaves are a shock of color. A big glass of fresh apple cider, or maybe even a piping hot apple donut, could be right around the corner. For sure, a night of revelry could be counted on. Halloween, a night where anything goes, where imagination is king and candy corn is queen.
You could be an Angry Ninja if you so pleased.

The wrath of an angry ninja.
Or a Lovely Lady in mom’s high heels.

Just lov-e-ly dahling.
When the witching hour arrives, and your little fingers and toes are frozen through, the best part of the evening is here. It’s time to go home and sort through your loot.
Let the opening bell sound, it’s trading time.
Good ‘N Plenty’s were the worst and went straight to Dad. Blech. Skittles and Starburst held decent clout. The big guns, the Apple stock of our world, were Twix, Snickers, and Reese’s Peanut Butter Cups. Which is why I was so excited when I saw Chow’s Guide to Making Your Own Candy Bars. Homemade versions of my childhood favorites made even better with the use of premium chocolate and the guarantee of zero preservatives added. Sign me up.
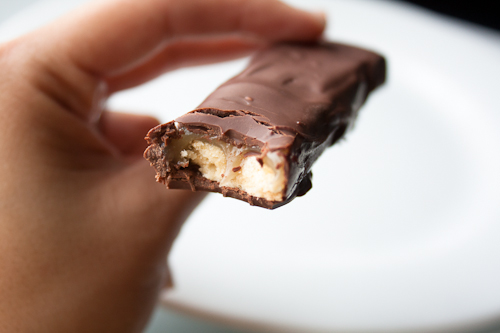
I decided to tackle the DIY version of One of Life’s Great Kicks. Twix.

Shortbread cookie base
First, we start with getting that cookie crunch. A shortbread base is made and cut to the appropriate candy bar size. Before baking, small indentations are poked into the dough (not sure exactly why…could be to prevent the cookie from rising?).

Chewy caramel
Now on to the chewy caramel layer.

Tempered chocolate coating
And then, the coating of milk chocolate.
To be sure, making your own Halloween candy is pretty time and labor intensive. But, the results will bring you right back to the sugar-high times of yesteryear.

Twixt (Photo Credit: Chow.com)

Ingredients
- 1 large egg, at room temperature
- 1/2 teaspoon vanilla extract
- 2 cups all-purpose flour
- 3/4 cup powdered sugar
- 1/2 teaspoon kosher salt
- 1/2 teaspoon baking powder
- 10 tablespoons unsalted butter 1 1/4 sticks, at room temperature and cut into small pieces
- Cooking spray, such as Pam
- 1 cup granulated sugar
- 3/4 cup heavy cream
- 1/2 cup light corn syrup
- 4 tablespoons unsalted butter 1/2 stick
- 1/4 teaspoon kosher salt
- 1/2 teaspoon vanilla extract
- 1 1/2 pounds milk chocolate couverture, such as El Rey 41 percent milk chocolate discs
Instructions
- In a small bowl beat together egg and vanilla extract until yolk is broken up and evenly combined; set aside.
- Combine flour, sugar, salt, and baking powder in the bowl of a food processor and pulse a few times to aerate and break up any lumps. Add butter and pulse until mixture looks like sand, about 25 (1-second) pulses. Add egg mixture and pulse just until dough comes together, about 10 (1-second) pulses. Form into a flat, rectangular disk, wrap in plastic, and refrigerate at least 1 hour.
- Heat oven to 375F. Place dough on a 14-inch piece of parchment paper, lightly flour, and roll into a 13-by-8-inch oval, about 1/8 inch thick. (Work quickly, because the dough will become difficult to roll as it warms up.) Transfer parchment paper with dough to a baking sheet, cover in plastic wrap, and refrigerate at least 15 minutes.
- Trim dough to a 12-by-7-inch square and cut into 3-1/2-by-3/4-inch cookies (you need at least 24). Pierce each cookie four or five times with a chopstick or the base of a thermometer.
- Place on a baking sheet and cook until golden brown, about 15 minutes. Remove to a wire rack and let cool. Meanwhile, make the caramel.
- Spray a 13-by-9-inch baking pan with cooking spray, then line the pan with a 16-by-13-inch piece of parchment paper, leaving a few inches of overhang on each side. Set aside.
- Combine all ingredients except vanilla extract in a heavy-bottomed 4-quart saucepan fitted with a candy thermometer and place over medium-high heat. Stir mixture until sugar completely dissolves, about 2 minutes. Wash down the inside of the pan with a wet pastry brush to prevent crystallization. Boil mixture, swirling pan occasionally (but not stirring), until syrup is at 248F, about 8 minutes.
- Immediately remove the saucepan from heat, stir in vanilla extract, and pour caramel into prepared baking pan. Using an oiled rubber spatula, spread caramel evenly in the pan. Immediately press 24 cookies, pierced side down, into caramel, leaving space between them to cut them apart later.
- Let cool until caramel is no longer warm to the touch and holds a slight indentation when pressed with your finger, about 40 minutes. Place filling in the refrigerator until caramel is firm and can easily be cut through, about 40 minutes.
- Remove filling from the baking pan to a cutting board, caramel side down, and, using a sharp knife, cut around each cookie. Peel off parchment paper, place undipped candy bars on a cutting board, caramel side down, and trim away excess caramel. Immediately place on a parchment-lined baking sheet, cookie side down, and set in the refrigerator until caramel is hard, at least 10 minutes. (Note: It’s best to work in a cool area for this step.) Meanwhile, temper chocolate.
- To temper chocolate, fill a large bowl with 2 inches of cold water, add 3 to 4 ice cubes, and set aside.
- Bring a saucepan filled with 1 to 2 inches of water to a simmer over high heat; once simmering, turn off heat. Place 18 ounces of the chocolate in a dry heatproof bowl. Set the bowl over the saucepan and stir until chocolate is completely melted and reaches 118F. (Make sure chocolate does not come in contact with water or exceed 120F. If either happens, start over, as the chocolate is no longer usable.)
- Remove the bowl from the saucepan. Add remaining 6 ounces chocolate and stir until all chocolate is melted and cools to 80F. To speed the cooling process, after all chocolate has melted, place the bowl over the reserved cold-water bath. Meanwhile, take undipped candy bars out of the refrigerator.
- Return the bowl to the saucepan and stir until chocolate reaches 86F; immediately remove from heat. Do not remove the thermometer from the bowl; check the temperature periodically to make sure it stays between 85F and 87F. (Chocolate must remain in this temperature range while dipping or it will not set up properly.) Keep the saucepan over low heat and use it to reheat chocolate as necessary.
- To test if chocolate is properly tempered, spread a thin layer on parchment paper and place it in the refrigerator for 3 minutes to set. If chocolate hardens smooth and without streaks, it is properly tempered. (If it is not properly tempered, you need to repeat the process.)
- Line a baking sheet with parchment paper. Drop candy bars one at a time, cookie side down, into tempered chocolate. Cover caramel side with more chocolate, then remove candy bar. To do so, hold two dinner forks in one hand, crossing the ends of the handles to form a V, with the tines pointed outward. As you remove each candy bar, tap the forks several times against the edge of the bowl and scrape the bottom of the forks across the edge to wipe away any excess chocolate.
- Place Twixt on the baking sheet by tilting the forks so the edge of each candy bar touches the parchment-lined pan, then smoothly pull the forks out. Repeat until all candy bars have been dipped. Let sit at room temperature until completely set, at least 20 minutes.
- Trim any excess chocolate from edges of candy bars and place Twixt in an airtight container. Twixt will last up to three weeks in the refrigerator or up to two months in the freezer. Let come to room temperature before serving.
Notes
Recipe by Aida Mollenkamp, courtesy of Chow.
Recipe Source: LickMySpoon.com.
Hello! All images and content are copyright protected. Please do not use our images without prior permission. If you want to republish this recipe, please re-write the recipe in your own words, or simply link back to this post for the recipe. Thank you!


Add comment